airMAX - How to Configure a PoE Bridge
Overview
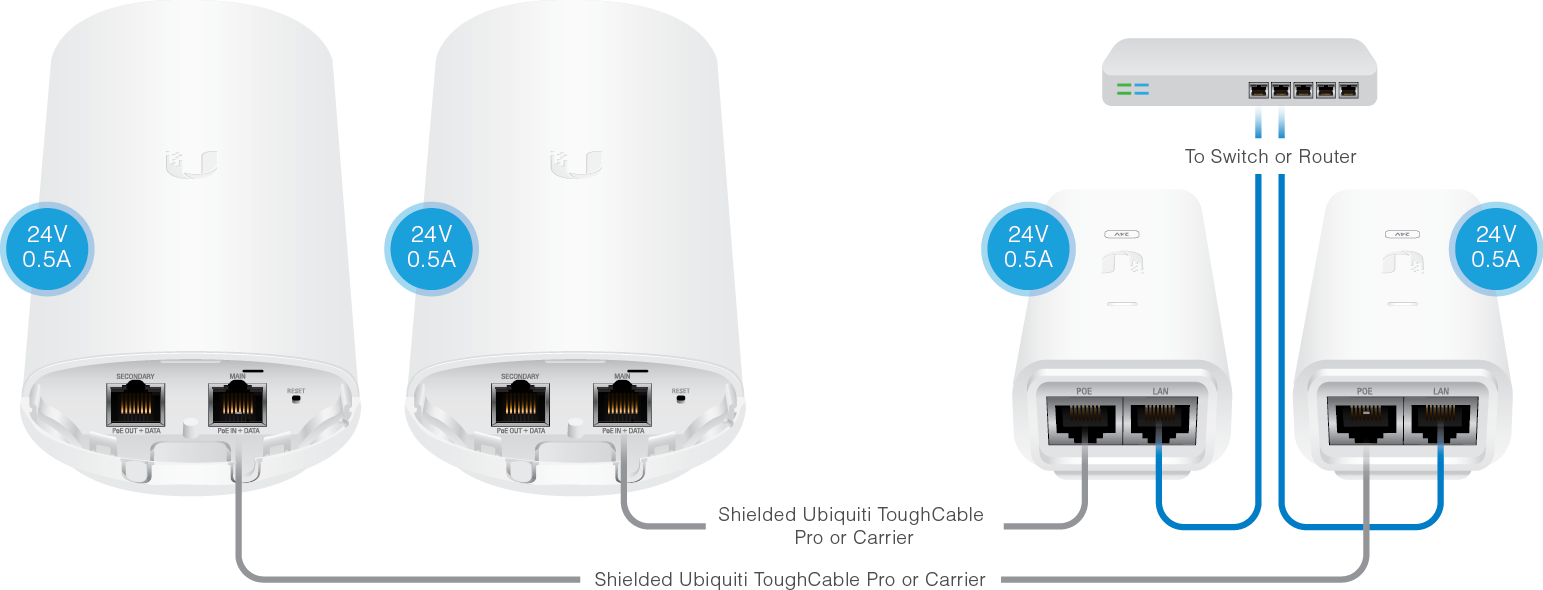
This article demonstrates four different configurations for a PoE Bridge with airMAX devices.
NOTES & REQUIREMENTS: This article covers different possible combinations using a NanoStation 5AC as an example. Different devices have different power specifications, please remember to always verify powering data in each device's Data Sheet and Quick Start Guides (links to these can be found at the bottom of the specific product pages in https://www.ubnt.com/products/). |
Table of Contents
- Traditional: Two Devices and Two PoE's
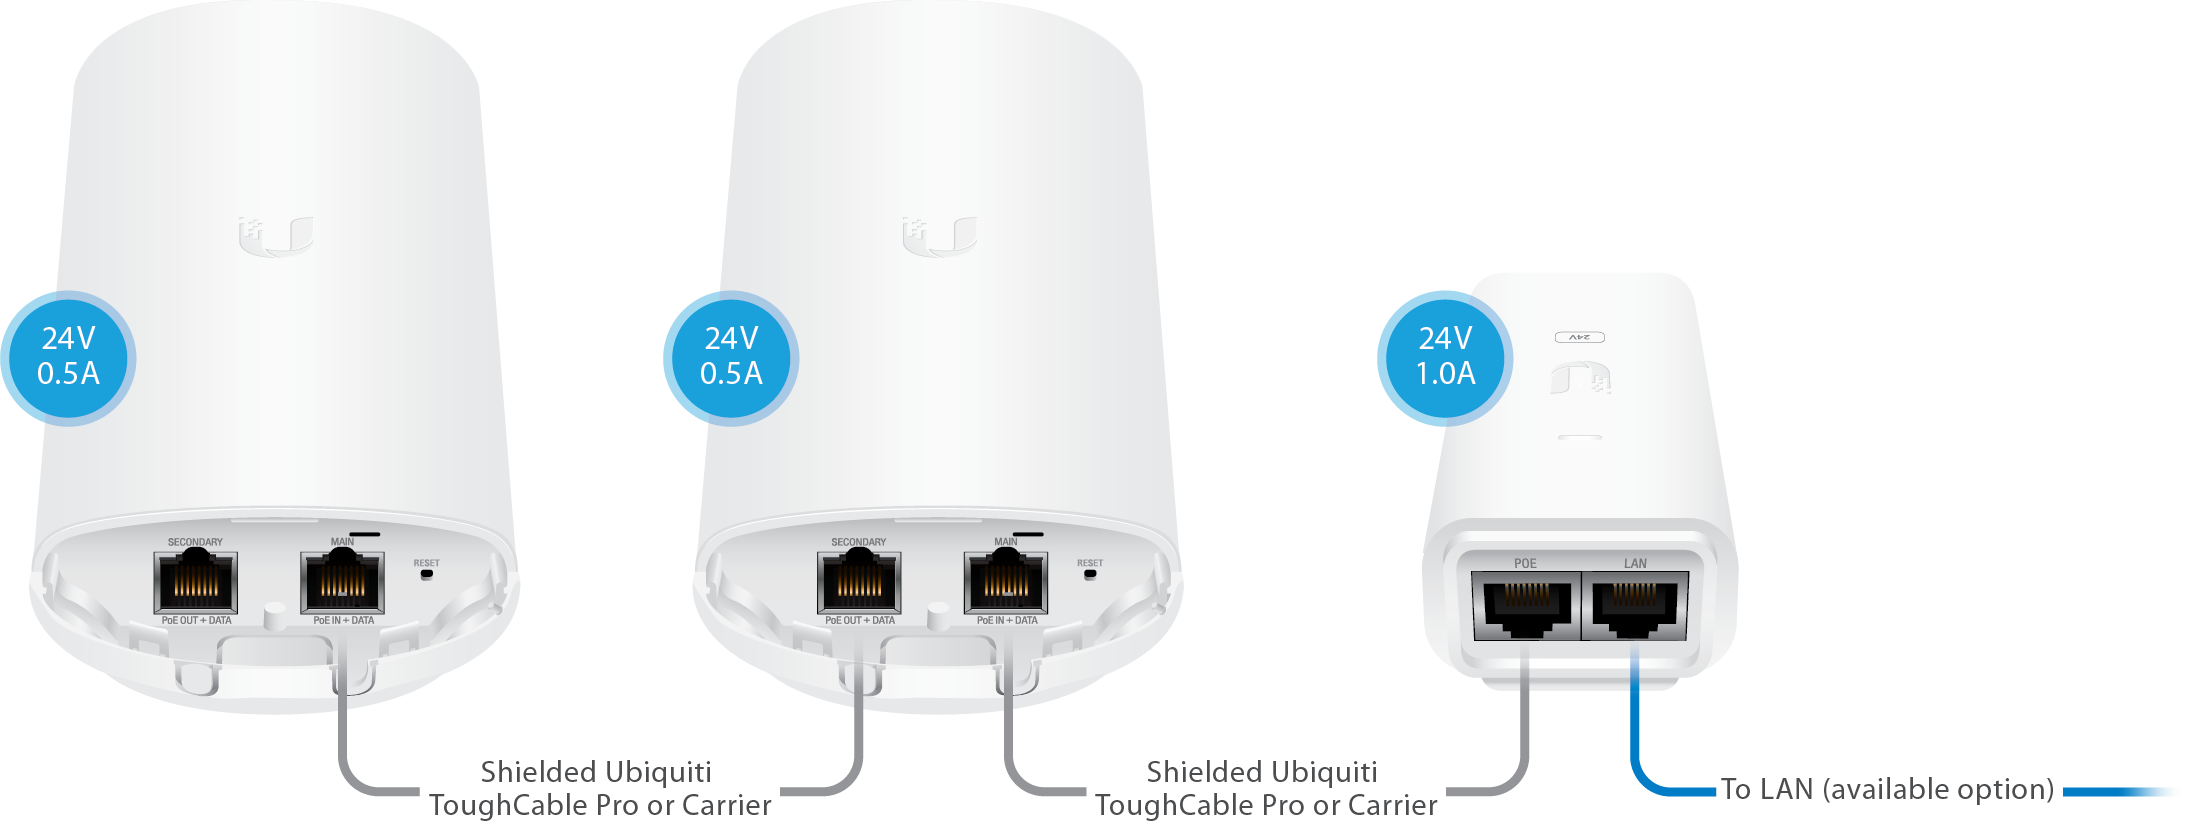
- PoE Passthrough: Two Devices and One PoE
- PoE Linking: Two Independently Powered M Devices and One PoE
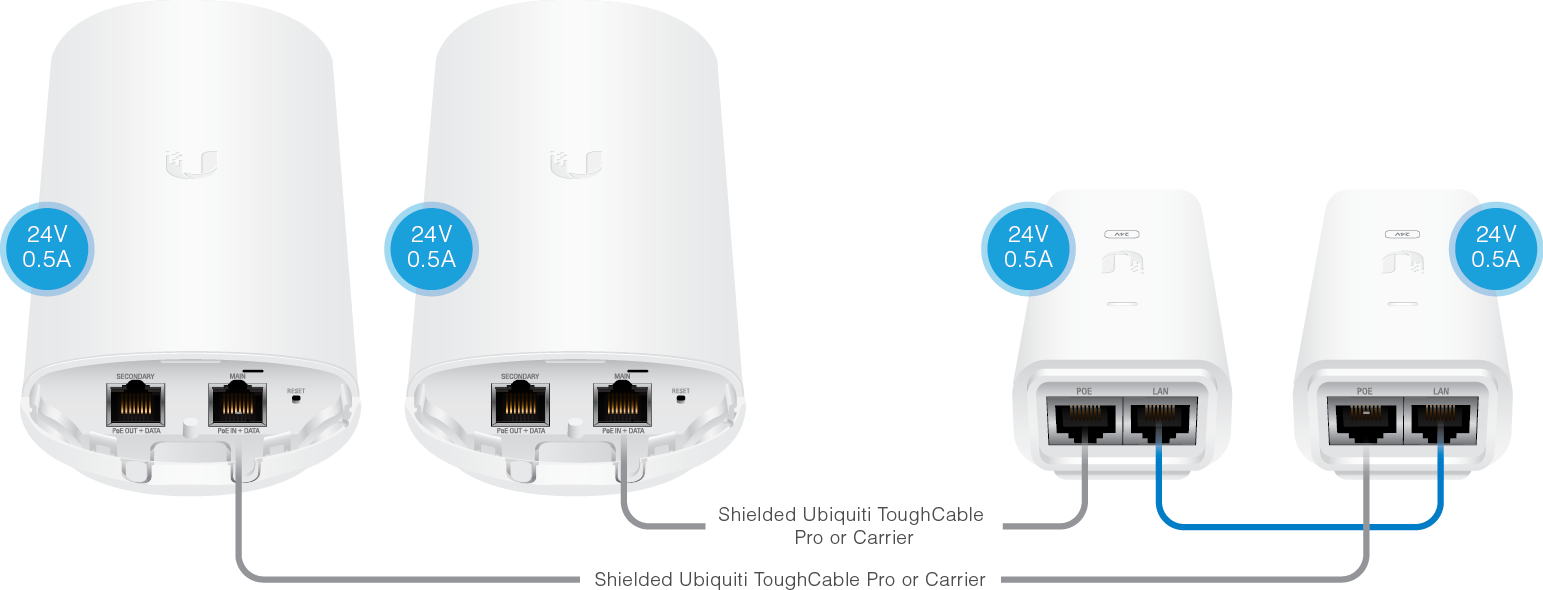
- PoE Bridge: Two Devices and Two PoE’s
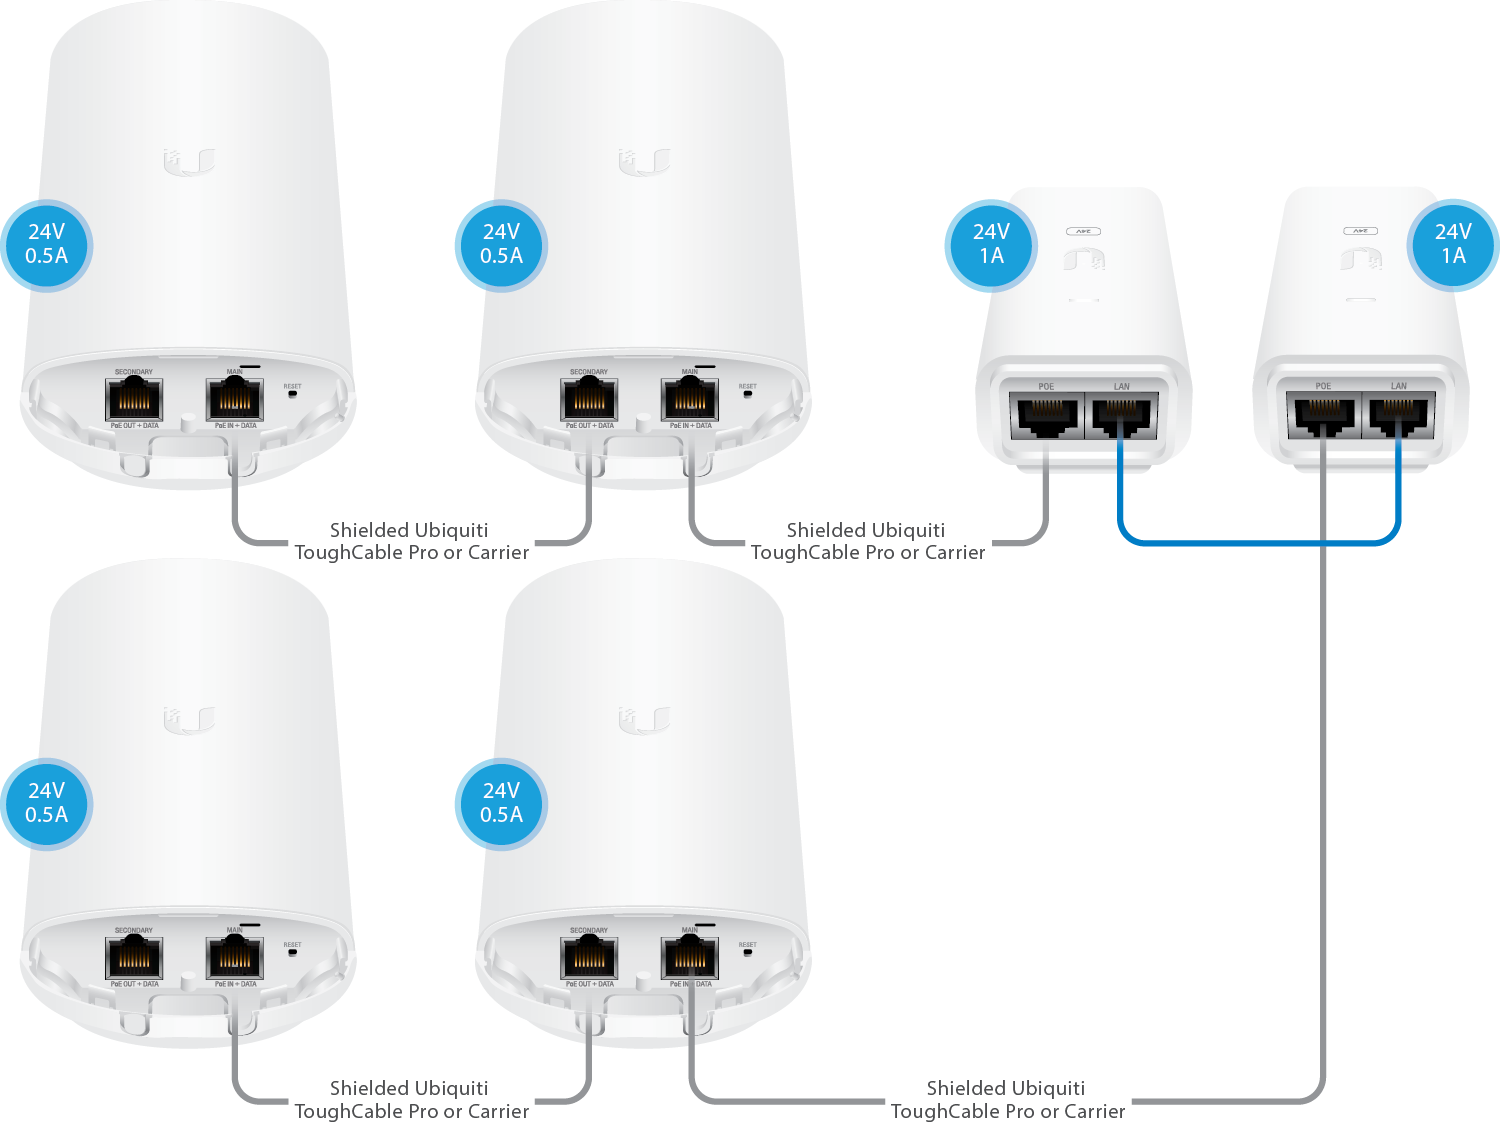
- PoE Bridge and Passthrough: Three or Four Devices and Two PoE's
Traditional: Two Devices and Two PoE's

PoE Passthrough: Two Devices and One PoE
This configuration is only possible when the UBNT device has a secondary Ethernet port which can be activated for PoE Passthrough. When enabled, the device allows Power over Ethernet (PoE) power to pass from the main port to the secondary port, thereby powering an additional device. From within the airOS configuration console, navigate to the Advanced tab, go to Advanced Ethernet Settings and enable PoE Passthrough.

PoE Linking: Two Independently Powered M Devices and One PoE
This is only valid for airMAX M devices. It is a similar configuration to the previous one, but with an added feature. If you power the first radio through the "Secondary" port rather than the "Main" port, power is not lost to the next device if the first radio is rebooted.
ATTENTION: For this configuration, do NOT enable PoE Passthrough as referenced in the section above. The PoE Passthrough option must be left unchecked in the Ethernet Settings section. |
PoE Bridge: Two Devices and Two PoE’s
For this configuration , there is no need (and also no possibility) of a switch or router.

PoE Bridge and Passthrough: Three or Four Devices and Two PoE's
This configuration is only possible when the UBNT device has a secondary Ethernet port which can be activated for PoE Passthrough. When enabled, the device allows Power over Ethernet (PoE) power to pass from the main port to the secondary port, thereby powering an additional device. From within the airOS configuration console, navigate to the Advanced tab, go to Advanced Ethernet Settings and enable PoE Passthrough.
NOTE: We recommend upgrading the PoE power supply to a model that outputs 24Watts like the POE-24-24W (100Mbps) or POE-24-24W-G (1Gbps) when powering a second unit via PoE Passthrough. |

Related Articles
Ubiquiti AirMax Device Interoperability and DFS Availability
Item DFS Approved Backwards Compatible DFS notes Ubiquiti : AF-2X(US) NA NA Ubiquiti : AF-3X(US) NA NA Ubiquiti : AF-5X(US) Yes No Ubiquiti : BulletM2-HP(US) NA NA Ubiquiti : BulletM5-HP(US) No Yes Ubiquiti : IS-5AC(US) No Yes In process, ...How to Bridge Two Ubiquiti Devices
This guide will walk you through the process of configuring two Ubiquiti devices to be a transparent wireless bridge. For the older M Series Radios: The article is a PDF file you can download from HERE . For the newer AC Radios Running AirOS 8 The ...Ubiquiti Warranty
Warranty Terms for Ubiquiti Networks Products All Ubiquiti Networks manufactured products are warranted against defects in material and workmanship for a period of one year from the date of purchase, under normal use and operation. The customer ...Bridge Two MikroTik Devices
Need a wireless bridge between two buildings or a quick backhaul link? Have a pair of RouterBoard 411?s with their original Level 3 license lying around? Then great, you have exactly what you need to build a point to point link. ?What? I thought I ...Basic Script to Configure a Blank MikroTik Router
I have developed a script you can simply paste into the router and it will configure everything for you and get you started on the right track. /ip address add address=192.168.1.1/24 disabled=no interface=ether2 add address=192.168.2.1/24 ...