Port Forwarding on a Teltonika Router
How to Open Ports in a Teltonika RUT950 Router
This Teltonika RUT950 router has a firewall that helps protect your home network from unwanted Internet access. The firewall does this by blocking all ports or connections that are not authorized. This can cause trouble if an online game or program needs some of these non-authorized ports to run efficiently. If you are getting kicked out of the game or program or the program lags you may need to authorize some additional ports. This is frequently called a port forward.
In this guide we will show you exactly how to port forward on the Teltonika RUT950 router. We will show you how to:
- Setup a static IP address on the device you plan on forwarding these port to.
- Login to the Teltonika RUT950 router.
- Find the port forwarding section of the router.
- Enter the port forwarding information to create a port forward
Step 1
It is important to setup a static ip address in the device that you are forwarding a port to. This ensures that your ports will remain open even after your device reboots.
After setting up a static ip address on your devices you need to login to your router.
Step 2
In this second step we will walk you through the steps in logging into the Teltonika RUT950 router. First you will need to open up a web browser because this router uses a web interface to make setting changes. We recommend picking the browser you are most comfortable using. If you are unsure pick: Chrome, Internet Explorer, Firefox, or Edge.
After you have opened up the web browser of your choice, find the address bar. This is normally at the top of the page. Here is an example of an address bar:

We have circled the address bar for you. All you need to do is type the router's IP address into the web browser's address bar. Sometimes the router IP address is called the default gateway or the router's GUI address.
The default Teltonika RUT950 router IP address is: 192.168.1.1
After typing the router's IP address into the address bar, click the Enter key and you should be taken to a login page like this:

Enter the username and password to continue into the router's setup pages.
- The Default Teltonika RUT950 Router Username is: admin
- The Default Teltonika RUT950 Router Password is: passwor
Step 3
You should now be logged into the Teltonika RUT950 router interface. Let's find the port forwarding section now. We begin on the Overview page of the router:

Select the option at the top of the page labeled Network.
A new menu should appear. Select the new option of Firewall.

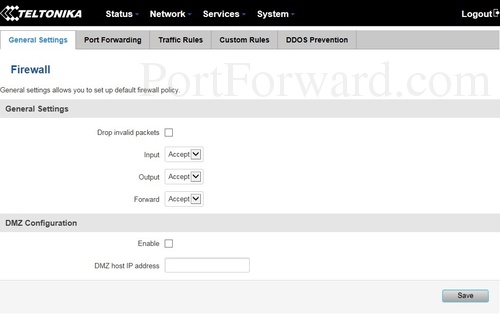
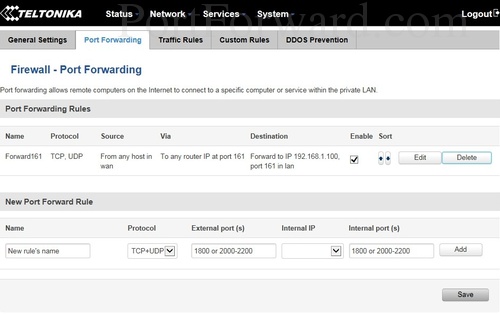
You should now see a page like the one above. Select the tab labeled Port Forwarding.

In the next step you will be entering information under the New Port Forward Rule heading.
Step 4
Here are the ports to forward for Xbox Live:
TCP Ports: 3074 UDP Ports: 3074
You need to name this entry in the Name box. The name does not make any difference in the forward; it's just there so that you can remember later why you setup this forward.
In the Protocol box select the protocol that you want to forward these ports over.
Enter the port to forward into the External port(s) and the Internal port(s) boxes.
Enter the IP address that you want to forward these ports to into the Internal IP box. Note that if you are forwarding ports so you can run a program on a device other than your computer then you can enter your device's IP address into that box instead.
After you are done click the Add button.
When you are finished, be sure to click the Save button at the bottom of the page.
Related Articles
802.1Q Router on a Stick Example
From ISP Supplies Customer Learning Center Router-On-A-Stick - 802.1Q Trunking With MikroTik SWOS Router-On-A-Stick is a phrase referring to the connection of a 802.1Q capable switch to a single router interface. By trunking across the Ethernet ...How to Log Into a Mikrotik Router
After you have installed the RouterOS software, or turned on the Router for the first time, there are various ways how to connect to it: Accessing Command Line Interface (CLI) via Telnet, SSH, serial cable or even keyboard and monitor if your router ...Netonix WISP-Switch & Mikrotik Router on a Stick Howto
In this example we will build a router on a stick. We want to manage the switch from port 8 using inter vlan routing on the router. Here is the physical setup: 1. To configure the switch, set an IP address of 192.168.1.1/24 on your laptop and log ...RUT955 supported frequency bands
Summary Different countries and network operators use different frequency bands for communication in their respective mobile networks. Therefore, in order to communicate within an operator's network, the mobile equipment to has to support the ...Teltonika LTE Modem Basic Setup
When configuring a new Teltonika modem, the only thing you have to set to get it to work is the APN. For AT&T SIMs purchased From ISP Supplies For Verizon SIMs purchased from ISP Supplies A complete list of APN's we know of is HERE. For a complete ...